“Moooom, I’m boooored!”
If that phrase makes your eye twitch and your coffee go cold, you’re in the right place. Why not turn what you’d normally throw away into something fun and actually cute? These fun and cute toilet roll crafts will not only keep your little one busy but you’ll even have something to show off in your mom group. Win-win.
Scroll through the list and click on whatever sounds like fun today!
When my daughters were little (back when I thought a “creative morning” meant peace and quiet — not a kitchen covered in glitter), we made crafts all the time. Back then, we didn’t call it being an “Instragam mom.” It was just: “Mom, do you have a minute?” And of course, I always did. Because I genuinely loved making stuff with my hands — and as a social pedagogue, I knew exactly how much kids benefit from fun and cute toilet roll crafts.
This isn’t just about cardboard tubes. It’s about moments where:
- They practice fine motor skills while cutting
- They build vocabulary as we name the googly-eyed owl together
- They learn to follow steps and finish tasks
- They develop problem-solving skills
- And they feel the joy of creating something from nothing — even if it turns out… let’s say… abstract
Starter Supplies (a basic craft stash):
- Empty toilet paper rolls (each one = pure potential!)
- Kid-safe scissors
- Glue sticks and/or liquid glue
- Colored paper or leftover wrapping paper
- Markers, crayons, watercolor paints
- Buttons, pom-poms, glitter (aka the universe’s way of humbling parents)
- Googly eyes (or just draw some!)
- A dash of patience, a cup of coffee, and a wipeable table
This list can definitely be expanded — and I’ll be sharing more ideas as we go!
Themed = Smart (and Sanity-Saving)
And here’s another thing I love — and honestly, need — about these fun and cute toilet roll crafts: they’re grouped by theme and season.
Why? Because:
- You can come back to them again and again — rainy day? Halloween? Spring break? There’s always something that fits.
- You can offer your child a choice — which is a small but mighty parenting win. “Do you want to make an owl or a snowman?” Instant engagement.
- It makes transitions smoother — crafting a Christmas elf feels like Christmas. A butterfly? Hello, springtime!
- And let’s be real: it helps us moms feel like we have our act together. Like we’re not just grabbing toilet rolls and praying for a miracle.
So yes, having them organized like this isn’t just cute — it’s clever parenting in disguise. You’re welcome. 😊
1. Spring & Easter


via Day with DIY
Spring crafts are basically nature’s way of reminding us that tiny hands + glue + glitter = chaos… but also magic. After months of being cooped up with cold noses and cabin fever, spring is a perfect excuse to open a window, bust out the craft supplies, and bring a little color (and sensory stimulation!) back into your child’s world.
How to Make Easy Egg Baskets Flowers
via Elena’s Craft Studio
Toilet Paper Roll Chick Craft
Easter crafts are a great chance to sneak in some conversations about nature, new life, or — let’s be honest — chocolate eggs. Lots of them.
Just remember: no matter how Pinterest-worthy these look, the goal is fun, not perfection. Unless your kid is secretly a miniature Michelangelo, in which case… congrats?
How To Make A Baby Lamb
Sheep Toilet Paper Roll
Easter Bunny | DIY Easter Crafts
via Creative Crayon
How to Make Super Easy & Cute EGG BASKETS
via Elena’s Craft Studio
2. Summer – Flowers, Bees & More
via Two Little Handz
via TinkerHits
Ah, summer — that magical time of year when kids wake up at 6:03 AM with full energy and absolutely zero regard for your caffeine intake. Good news? It’s the perfect season for nature-inspired fun and cute toilet roll crafts that bring the outdoors inside (without the bug bites or sunburns).
From buzzing bees to fluttery butterflies and bright toilet roll flowers, these activities don’t just look adorable stuck to your fridge — they’re secretly:
- building hand-eye coordination (those wings won’t glue themselves),
- encouraging nature conversations (“Yes, bees are our friends — even if they sting”),
- and helping kids connect to color, texture, and seasonal changes.
via Laura Dogariu
via Elena’s Craft Studio
via Easy Fancy Crafts
via Day with DIY
3. Fall & Halloween
DIY Fall Tree – Toilet Roll Craft
Step 1 – Gather your supplies
You’ll need: a toilet paper roll, colored paper (red, orange, yellow), glue, scissors, crayons or markers. Optional: googly eyes for extra cuteness.
Step 2 – Prepare the tree base
Use brown paint or a crayon to color the toilet roll. Then cut small vertical slits around the top and gently fold them outward — these will be the branches.
Step 3 – Make and glue the leaves
Cut out simple leaf shapes from the colored paper. Use glue to attach them to the top branches of the roll and even around the base.
Step 4 – Add personality!
Stick on googly eyes and draw a smiley face to bring your tree to life. Bonus points for adding falling leaves around it!


Ahh, fall — the season of crunchy leaves, pumpkin everything, and trying to convince your child that a hoodie counts as a coat. It’s also one of my favorite times for fun and cute toilet roll crafts, because honestly? There’s so much to work with: spooky stuff, cozy stuff, nature stuff… and glitter. Always glitter.
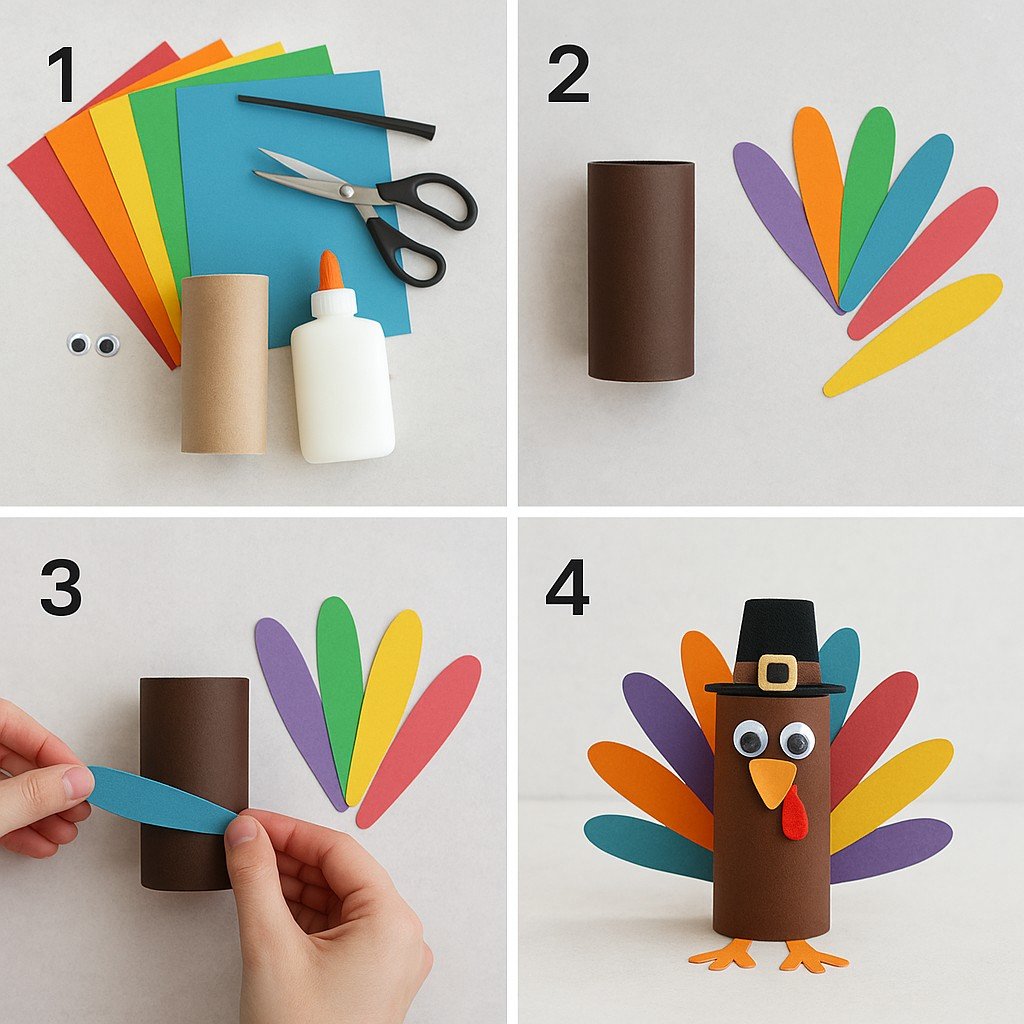
Step 1 – Gather your supplies
You’ll need:
- an empty toilet paper roll
- brown paint or paper
- glue
- scissors
- googly eyes
- colorful construction paper (orange, red, green, blue, yellow, purple — the more colors, the more fun!)
Step 2 – Prepare the parts
Wrap or paint the toilet roll brown to make the turkey’s body. Then cut out several feather shapes from the colored paper. You’ll also need to cut out:
- an orange triangle for the beak
- a red teardrop shape for the wattle
- small orange feet
- and a black pilgrim hat if you want to go festive!
Toilet Roll Turkey – Step-by-Step Craft Instructions
Step 3 – Assemble the turkey
Start gluing the feathers to the back of the toilet roll. Arrange them in a fan shape so they look full and colorful. Use glue to add the eyes, beak, and wattle to the front.
Step 4 – Final touches
Attach the little feet at the bottom and the hat on top — now your turkey is ready to gobble-gobble its way to the Thanksgiving table (or at least the fridge door)!
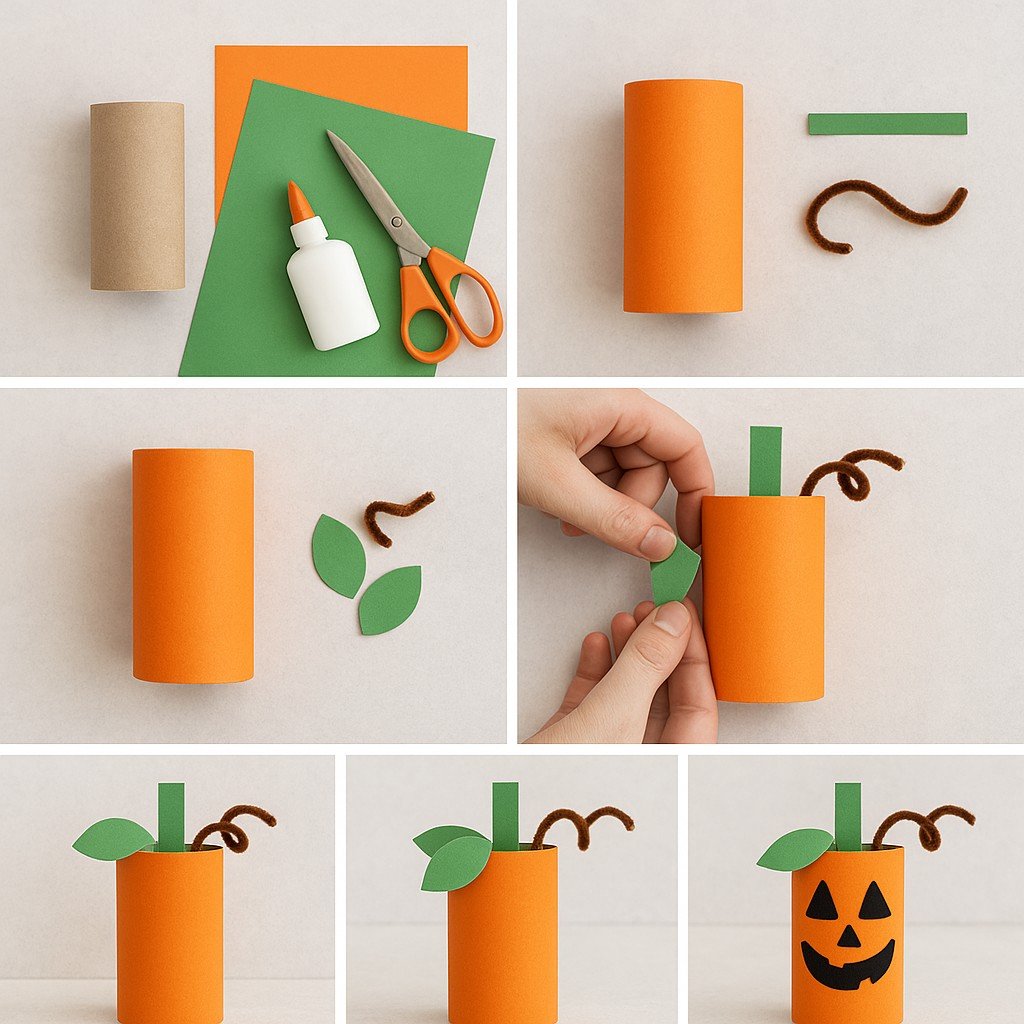
Toilet Roll Craft Pumpkin
Step 1 – Gather your supplies
You’ll need:
- an empty toilet paper roll
- orange and green construction paper
- brown pipe cleaner or twine (for the vine)
- scissors
- glue
- (Optional: black paper or marker for a jack-o’-lantern face)
Step 2 – Wrap the roll
Cover the toilet paper roll with orange paper or paint it orange. Cut a small green rectangle for the stem and curl the pipe cleaner to make the vine.
Step 3 – Prepare the leaves
Cut out two or three simple leaf shapes from the green paper. These will go near the stem for that classic pumpkin look.
Step 4 – Assemble the top
Glue the green stem inside the top of the roll. Attach the curled pipe cleaner as the vine. Then glue the green leaves around the stem.
Step 5 – Add details
Adjust the leaves and vine for balance and cuteness. Make sure they’re secure — this pumpkin is meant to stand tall!
Step 6 – Make it festive (optional)
Turn your pumpkin into a jack-o’-lantern by adding a smiley face using black paper cutouts or drawing it on with a marker. Spooky-cute!
When my kids were little, autumn was our prime crafting season. We’d sit at the table, surrounded by leaves we weren’t supposed to bring inside, and make the most hilarious-looking spiders, owls, and pumpkin people you’ve ever seen. They were far from perfect — but they were ours. And guess what? While they were gluing googly eyes onto toilet rolls, they were also:
- learning about seasons and symbols,
- practicing scissor skills and focus,
- developing imagination and sequencing,
- and working that fine motor magic without even noticing.
Toilet Roll Spider
Step 1 – Gather your supplies
You’ll need:
- an empty toilet paper roll
- black and orange construction paper
- googly eyes
- scissors
- glue
- white paper or a cotton ball (for the bow tie or fangs – optional)
Step 2 – Prep the body and legs
Wrap the toilet paper roll with black paper (or paint it black). Cut out 8 long black strips for the legs and a small orange rectangle for the feet accents.
Step 3 – Attach the legs
Glue 4 legs to each side of the roll. Let them dry slightly, then bend them outward and downward so your spider can stand up on its own little creepy-cute legs.
Step 4 – Add the face and finishing touches
Glue on two googly eyes, draw or cut out a small smile, and add any extras you’d like — a tiny bow tie, little orange “shoes,” or even white paper fangs if your spider’s feeling spooky.


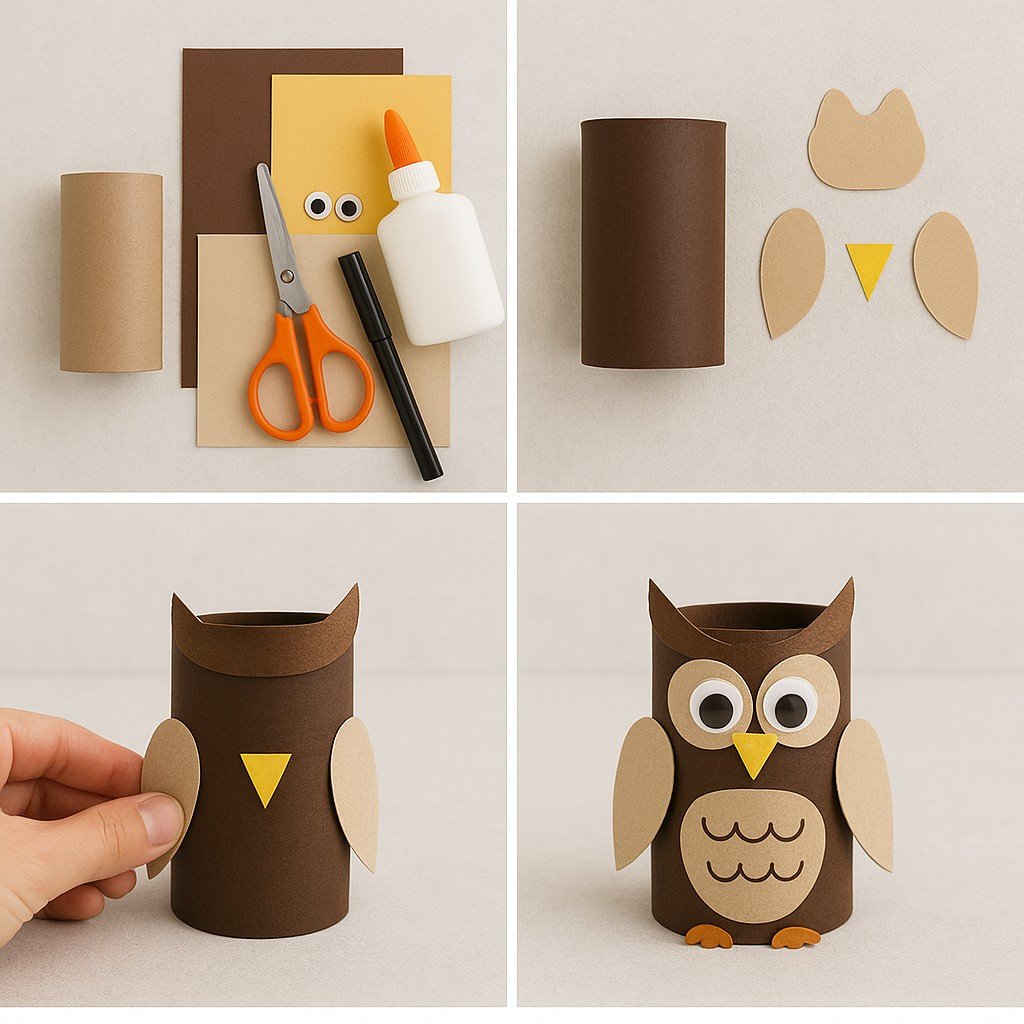
Step 1 – Gather your supplies
You’ll need:
- an empty toilet paper roll
- brown, beige, and yellow paper
- googly eyes (or white & black paper to make your own)
- scissors
- glue
- black marker (optional, for feather details)
Step 2 – Prepare the parts
Wrap the toilet roll in brown paper (or paint it brown). Then cut out:
- two beige wings
- a beige head piece with feather-like curves
- a yellow triangle for the beak
- optional: orange feet and paper circles for eyes
Toilet Roll Owl
Step 3 – Assemble the body
Glue the head piece to the top front of the roll so the points stick out like feather tufts. Then glue the beak and wings in place. If you made feet, attach them at the bottom.
Step 4 – Add eyes and details
Stick on the googly eyes or paper circles. Use a marker to draw little feather patterns on the belly — scalloped lines work great. And just like that, your wise little owl is ready to perch on a bookshelf or classroom windowsill!
4. Winter & Christmas
Yarn Gnome Ornament
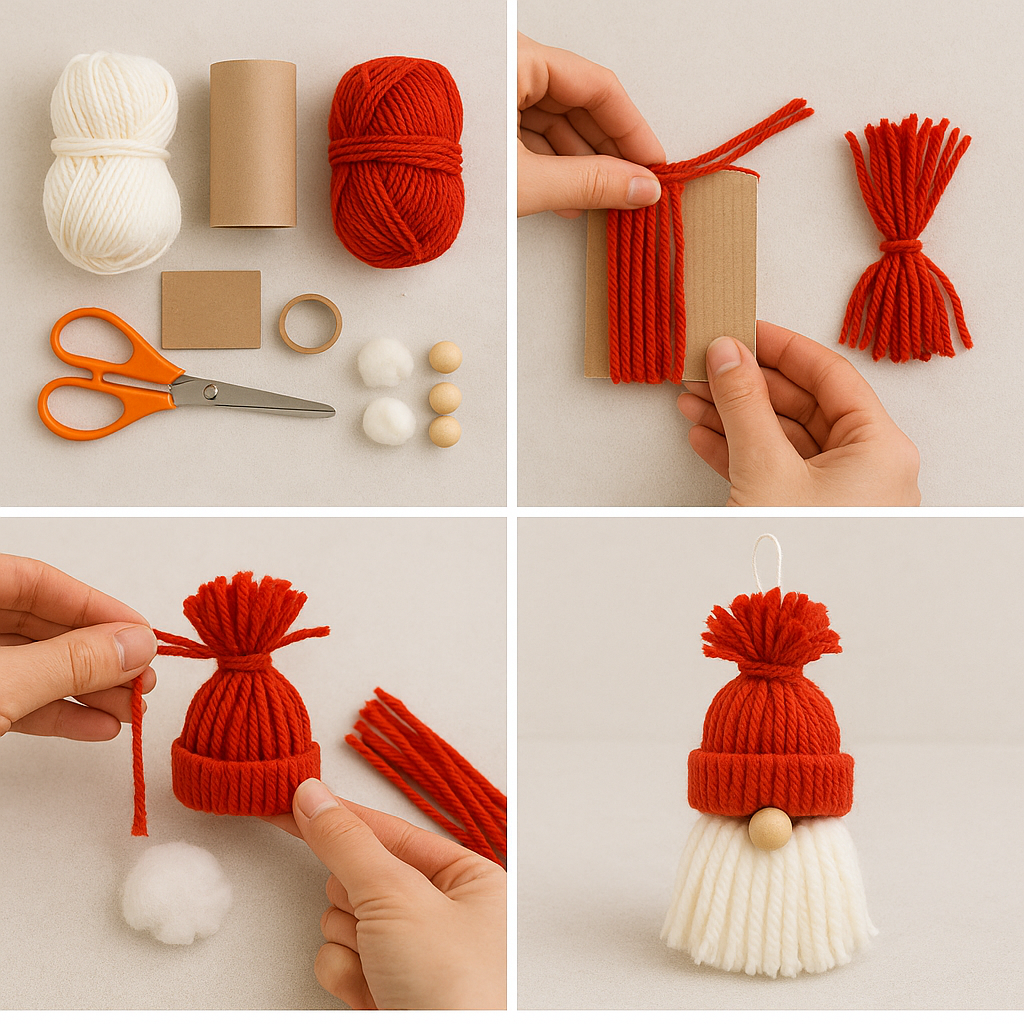
Step 1 – Gather your supplies
Here’s what you’ll need:
- an empty toilet paper roll
- red and white yarn
- a cardboard rectangle (for wrapping the yarn)
- scissors
- a 1 cm wide ring cut from the toilet roll
- cotton balls
- small wooden beads (for the nose)
Step 2 – Make the yarn strands
Wrap red yarn around the cardboard several times, then cut along one edge to make long strands. Take one strand, fold it in half, and loop it through the cardboard ring using a lark’s head knot. Repeat with all the red strands until the ring is fully covered.
Step 3 – Shape the hat
Push all the yarn strands through the center of the ring to the other side, creating the “hat” shape. Stuff a cotton ball inside to give it volume. Then tie a strand of red yarn near the top to close it off and create the pom-pom. Trim the ends for a clean, fluffy look.
Step 4 – Add the beard and nose
Cut several white yarn strands for the beard and glue or tie them under the hat’s rim. Attach a small wooden bead in the center as the nose. Finally, add a loop of yarn at the top so you can hang your little gnome on the Christmas tree.
Winter is the season where time slows down… or at least feels like it does when you’re trapped inside with small children, three layers of socks, and no idea what day it is. But don’t worry — this is also the perfect time to cozy up with some fun and cute toilet roll crafts that are way more exciting than hearing “can I watch something?” for the 47th time today.
Toilet Roll Elf
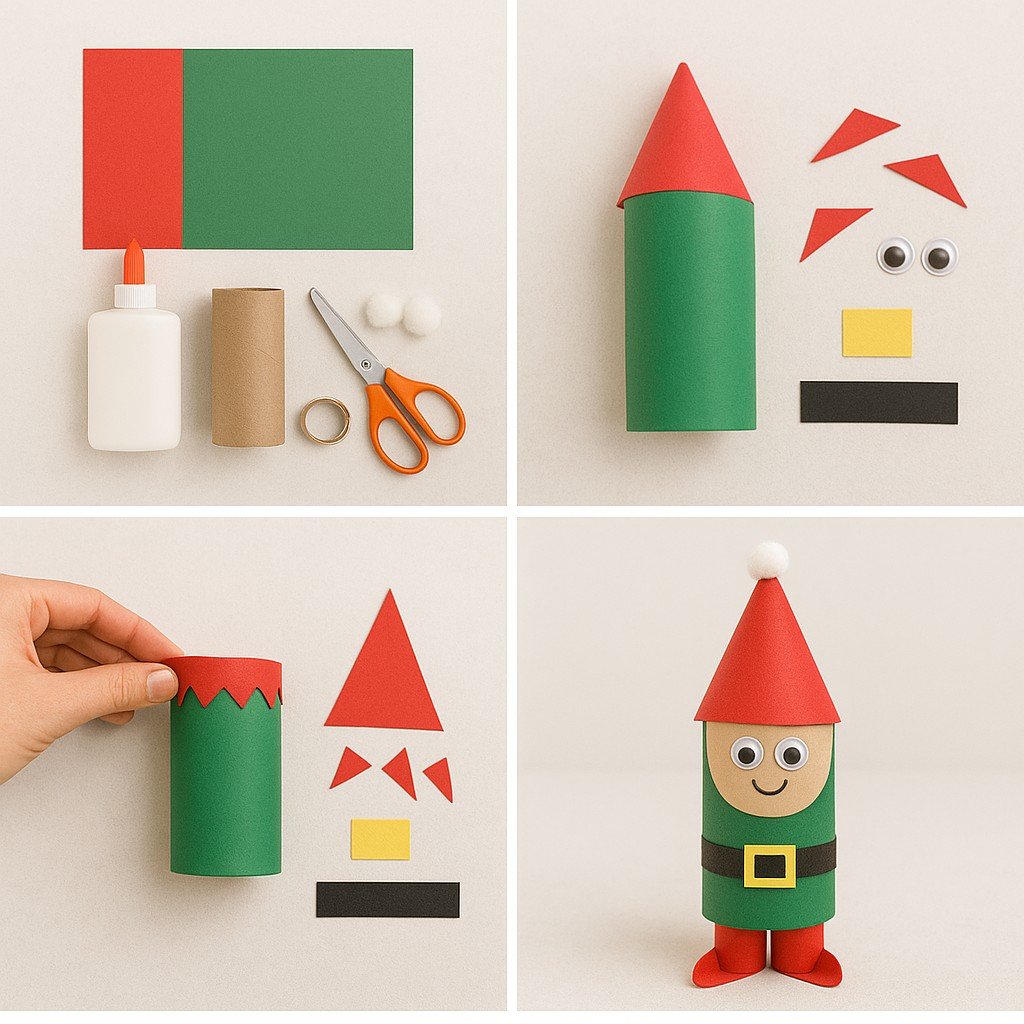
Step 1 – Gather your supplies
You’ll need:
- an empty toilet paper roll
- green, red, black, and yellow construction paper
- scissors
- glue
- googly eyes
- white pom-poms (for the hat tip)
- optional: tape or ruler for belt details
Step 2 – Build the body and hat
Wrap the toilet paper roll with green paper to make the elf’s outfit. Cut a large red triangle and roll it into a cone shape — that’ll be the elf’s pointy hat. Cut small red triangles to create a zigzag collar.
Step 3 – Add the details
Glue the red collar around the top of the green body. Then add the black belt around the middle and the yellow square as the buckle. Stick on the googly eyes and cut out or draw a simple smiling face. Add red paper feet if you’d like — they make him extra adorable!
Step 4 – Final touches
Place the red cone hat on top and glue a white pom-pom at the tip. You now have a jolly little elf ready to help Santa — or at least sit cutely on your windowsill and supervise the cookie situation.
via via Simple Everyday Mom
Toilet Roll Christmas Tree
Step 1 – Gather your supplies
Here’s what you’ll need:
- an empty toilet paper roll
- green and yellow construction paper
- glue
- scissors
- colorful buttons, pom-poms, sequins, or stickers (for ornaments)
Step 2 – Create the tree shape
Wrap the toilet paper roll with green paper to make the tree trunk. Then cut out a large triangle from green paper and fringe the bottom edge with short vertical cuts — this will create the layered look of pine branches.
Step 3 – Decorate the tree
Glue on your ornaments: colorful pom-poms, buttons, sequins — whatever you’ve got! Then cut out a yellow star and glue it to the top of the triangle.
Step 4 – Assemble your tree
Glue the triangle onto the top half of the roll so it stands tall like a Christmas tree. Let it dry completely. Once it’s done, you’ve got a festive little evergreen ready to light up your shelf, windowsill, or holiday table.


Toilet Roll Penguin
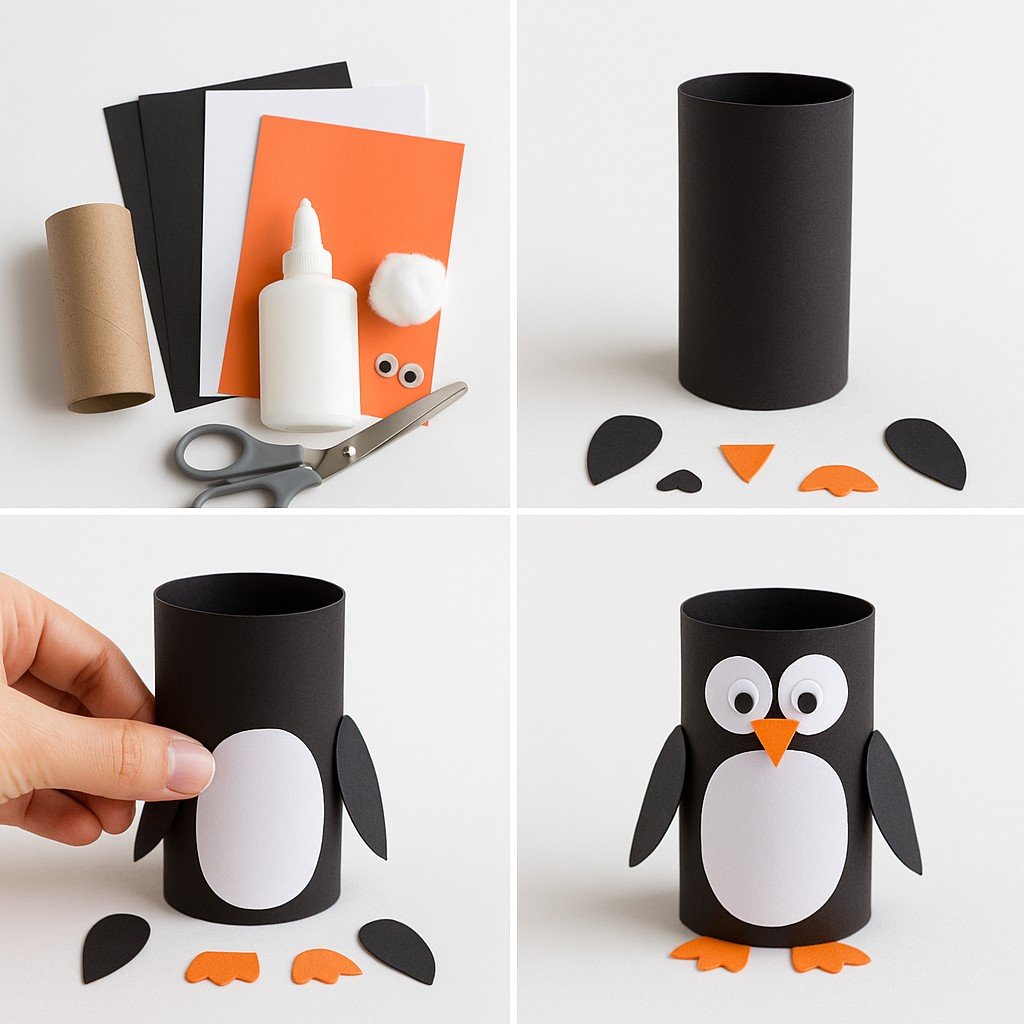
Step 1 – Gather your supplies
Here’s what you’ll need:
- an empty toilet paper roll
- black, white, and orange construction paper
- glue
- scissors
- googly eyes (or cut your own from paper)
- optional: cotton balls or felt for winter accessories
Step 2 – Prep the pieces
Wrap the toilet roll with black paper (or paint it black). Then cut out:
- one white oval for the belly
- two small black flippers (wings)
- two orange feet
- one orange triangle for the beak
- two round white paper circles if you’re not using googly eyes
Step 3 – Assemble the body
Glue the white oval onto the front of the roll. Then add the wings to each side, and glue the feet to the bottom so they peek out a little.
Step 4 – Add the face
Stick on the eyes near the top of the roll and glue the beak just below them. Want to dress up your penguin? Add a paper scarf or earmuffs for an extra wintery touch!
A Quick Note on Safety
As with any craft or activity, never leave young children unsupervised, especially when using scissors, glue, small objects, or anything that could pose a choking hazard.
Even the simplest play can get unexpectedly messy (or inventive), so make sure the space is safe, and all materials are age-appropriate.
And hey — part of the fun is doing it together, right?
I’d love to see what you and your kiddos create — tag me or drop a comment, and let’s inspire each other through the magic of cardboard tubes and creativity!
Final Thoughts
No matter which of these fun and cute toilet roll crafts you try first, I hope it brings plenty of giggles, gluey fingers, and cozy time together. Because in the end, it’s not about the perfect penguin or the straightest Santa hat — it’s about being creative together. Have fun, and happy crafting! 💛
And don’t forget to explore the rest of my creative BLOG — you’ll find plenty more fun ideas, tips, and inspiration waiting for you!
Don’t miss these extra fun crafts—they’re just too cute (and too easy) to skip!
Each and every Unique Mamma deserves a little expert support!
So Let’s keep in touch!
You’ll find plenty more on my Pinterest — follow me there too!
Be the first to know about my the latest contents.
Subscribe to my NEWSLETTER!
I would be happy if you would share your thoughts and questions.
Leave a comment or message!
E-mail: timea.klement@uniquemammas.com
Note: This post may contain affiliate links. As an Amazon Associate I earn from qualifying purchases. Please see Disclaimer policy for more information.


