Let’s be honest: Somewhere between the 45th “I’m bored” of the day and your third microwaved coffee, you realized it’s December. You want the magic. You want the memories. But you also want your living room not to look like a glitter bomb exploded.
Good news: I’ve got you.
These 10 simple and joyful Christmas tree paper crafts will keep the kids happy—and your sanity intact.
And though they all center around the same festive theme (hello, Christmas trees!), these crafts sneakily cover a wide range of skills—from fine motor magic to creative thinking and “I did it myself!” pride. Sometimes, the simplest projects bring the biggest joy. No need to overthink or start ten different Pinterest boards. Let’s just enjoy creating something delightful, one paper tree at a time.
And here comes the list—clickable, scrollable, and 100% mood-dependent. Just pick whatever you and the kids feel like today. I handpicked the most popular, kid-approved paper Christmas tree crafts out there (yes, I’ve tested them as a family coach and with actual children who aren’t afraid to tell me when something’s boring).
- Fingerprint Winter Tree Craft
- Upcycled Toilet Roll Christmas Tree Craft
- Handprint Christmas Tree Craft
- Super Cute Paper Christmas Tree Craft
- Festive and Fun 3D Christmas Tree Craft Idea
- Cone-Shaped Christmas Tree Craft with Fingerprint Lights
- Festive Fringe Christmas Tree Craft
- Paper Snow Globe Christmas Tree Craft
- Fork-Painted Christmas Tree Craft
- Elegant Layered Christmas Tree Craft
When my daughters were little, we spent entire December weekends knee-deep in construction paper, glue sticks, and the occasional meltdown (mine, obviously). Back then, I wasn’t a family coach—I was just a mom trying to survive the holiday season without turning into a gingerbread-scented banshee.
Now, with two grown girls and a career helping other families not lose their minds by December 18th, I’ve got a few tricks up my sleeve. These crafts aren’t just cute—they’re kid-tested, chaos-approved, and actually doable. Plus, I’ll share a few laughably relatable stories and snarky truths along the way. (Spoiler alert: glitter is a scam.)
1. Fingerprint Winter Tree Craft
(That Actually Looks Cute on the Windowsill)
I always start the crafting season with this one. It’s foolproof, fun, and low-stakes enough that even reluctant little hands warm up to it quickly. When my girls were younger, this was our go-to warm-up to kick off the season (read: distract them while I untangle last year’s fairy lights). There’s something magical about watching their tiny fingerprints become snowy trees—and honestly, this craft has saved more moods than I can count.
What You’ll Need:
- Cardstock (green, red, blue, grey – or whatever your toddler grabs first)
- White acrylic paint – washable if you like your sanity
- Scissors
- Cardboard rolls (toilet paper or paper towel rolls)
- Optional: brown paint for the “trunks”
- Optional: stickers – snowflakes, stars, or whatever sparkly nonsense they love
How to Make It:
Read the full step-by-step with visuals in this great tutorial by Our Kid Things:
👉 Fingerprint Winter Tree Craft – Our Kid Things
(Seriously, it’s well explained, and you’ll love how easy it is.)
2. Upcycled Toilet Roll Christmas Tree Craft
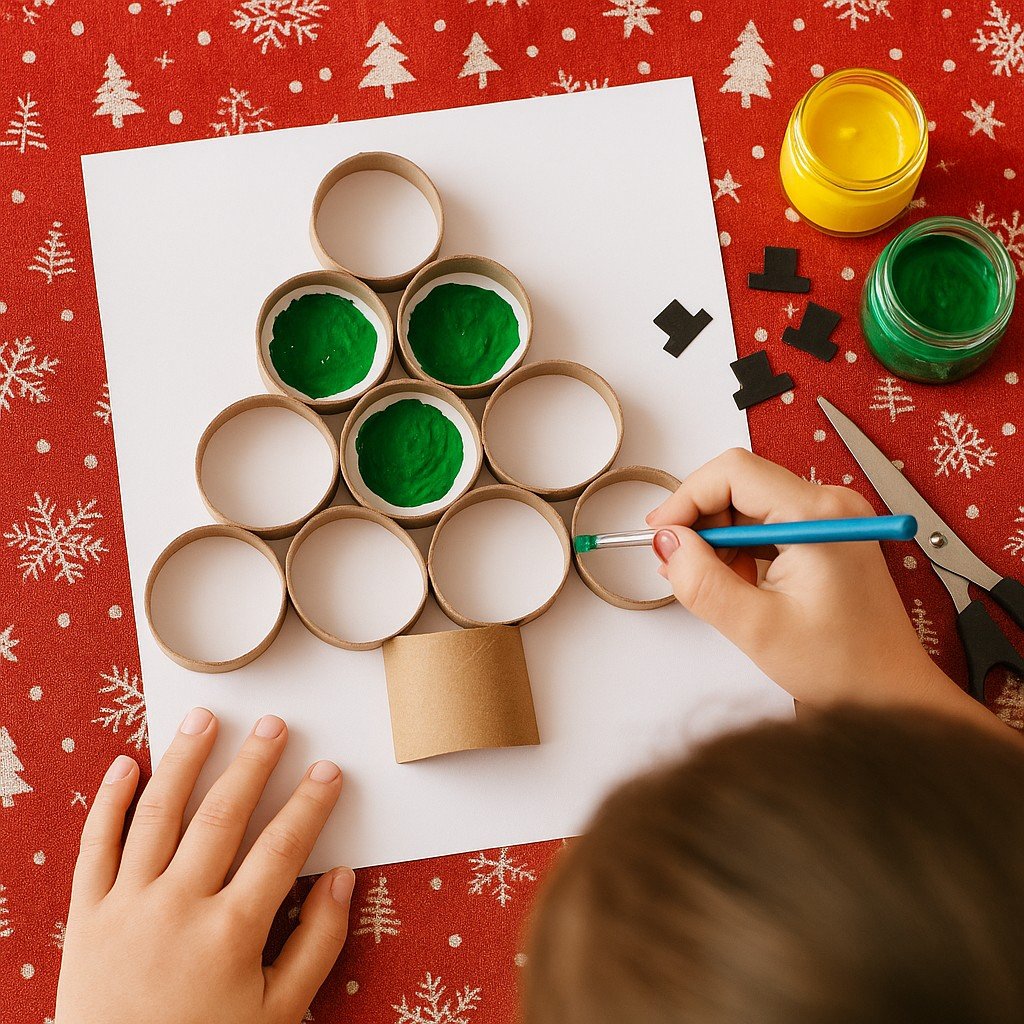
I’ve lost count of how many times I’ve said, “Save that toilet paper roll!” over the years. It’s like some weird mom-reflex. But honestly? This is one of the cutest ways to turn cardboard trash into Christmas treasure. I’ve done this with both my girls and with the kids I work with now—and every time, it’s a hit. The stamping motion is oddly satisfying, and even the messiest paint job somehow ends up looking Pinterest-worthy.
And bonus: it buys you a full 20 minutes of quiet. Maybe even a warm coffee. Maybe.
What You’ll Need
- Empty toilet paper rolls (or paper towel rolls cut to size – bonus points if you don’t squish them while prepping)
- Washable green paint
- A thick white sheet or cardstock for the base
- School glue
- Child-safe scissors
Optional: yellow paper or glitter foam for the star on top. You know they’ll ask for one.
How to Make It
You can find the full tutorial with step-by-step photos here (and yes, it’s worth the click):
👉 Christmas crafts for toddlers – via Homeschoolaec.com
3. Handprint Christmas Tree Craft
(Because Who Doesn’t Love a Tiny Handprint Saved Forever?)
Check out the full tutorial with helpful photos and clear steps right here:
👉 via Awesomely Crafty
(Seriously, it’s simple, fun, and the end result is refrigerator-worthy.)
What You’ll Need
- Green, brown, yellow, and assorted colored cardstock (a.k.a. the rainbow exploded on your kitchen table)
- Circle paper punch (or scissors and the patience of a saint)
- Child-safe scissors
- Glue stick or school glue
- Pencil (for tracing tiny hands and holding back mom-tears)
- Sparkly buttons, sequins, or pony beads (because let’s face it: they’ll want it fabulous)
Why It’s Great (Besides Being Adorable)
This craft works all the skills—fine motor, tracing, cutting, gluing, design choices, even counting if you sneak in “how many dots can you add?” (Spoiler: the answer is always “ALL of them.”)
It’s especially good for self-expression and sensory play if you’re brave enough to bring out the textured embellishments. Plus, it’s one of those keepsake crafts that make you all misty-eyed years later when you realize they used to have actual baby fingers.
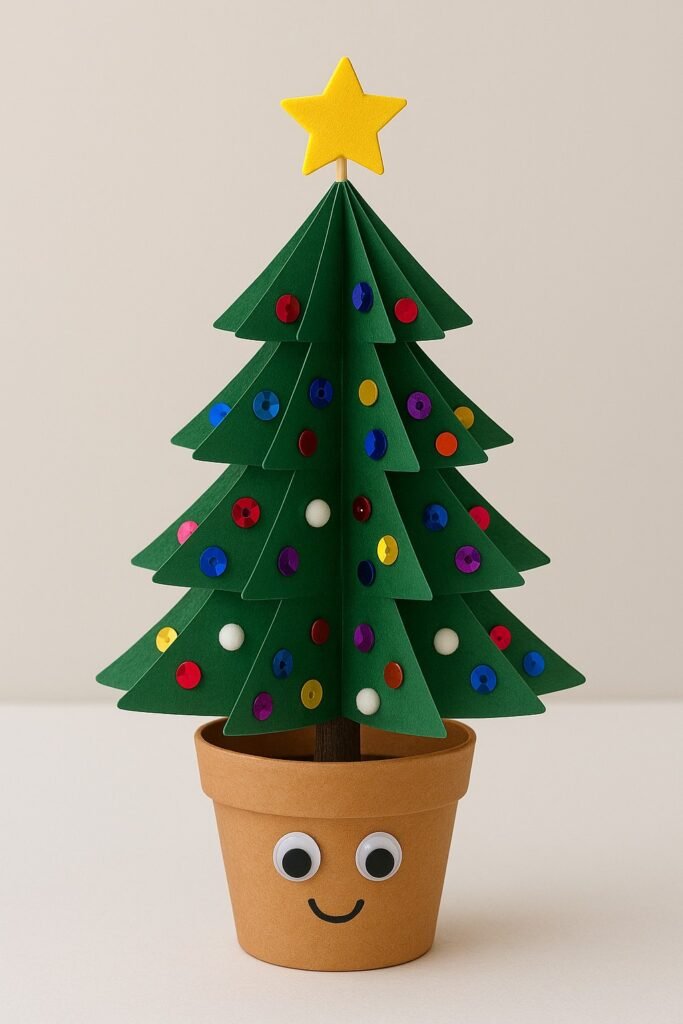
4. Super Cute Paper Christmas Tree Craft
What You’ll Need
- Square origami paper (approx. 6 x 6 inches / 15 x 15 cm) in green and festive colors
- Small scissors (bonus, if they’re not sticky with mystery glue from last week)
- Ruler (used for something other than sword fights, hopefully)
- Pencil for folding guides
- Black marker for drawing those adorable little faces
- Glue stick (or any craft glue that’s not completely dried out)
- Mini pompoms, sequin stars, tiny buttons—basically anything sparkly that fits in a flower pot
Why It’s Great
This paper Christmas tree craft idea is not only adorable, but also sneakily educational. It helps kids practice precision folding, basic geometry, pattern recognition, and following step-by-step sequences—yes, even the kids who usually do “creative interpretations” of instructions.
Plus, adding little faces? Instant emotional connection. Don’t be surprised if the trees get named, hugged, and added to the dollhouse family. Just draw a smiley mouth and glue on some googly eyes to the brown pot base—and boom, you’ve got yourself a Christmas tree with personality.
5. Festive and Fun 3D Christmas Tree Craft Idea for Kids
(That’ll Steal the Show)
What You’ll Need
- Bright colored cardstock sheets (bonus if they’re glittery)
- A printable 3D Christmas tree template
- Small foam star stickers
- Circle stickers or dot labels for decorating
- Tiny pompoms for added flair
- A glue stick for the basics, and tacky glue for the stubborn stuff
- Child-safe scissors
- Toothpicks (yes, really!) for precision glueing or pop-up effects
When my girls were younger, Christmas crafting was practically a full-time job. We tried everything. But the real fun started when we invited the neighbor kids over. Half of them crafted, the other half baked cookies—then they’d switch. The house smelled like cinnamon and glue sticks, and I honestly couldn’t tell who was stickier: the kids or the counters. But that was the magic of it. Total chaos, total joy.
This 3D paper Christmas tree was one of the clear favorites. It’s got layers, textures, and just enough sparkle to make every kid feel like they made the best one.

If you love keeping things organized and holding onto the memories, grab your FREE 32 page printable Christmas Planner PDF to make this season simpler, sweeter, and a little more magical.

How to Make It
You can find the full printable template and step-by-step instructions here:
👉 Colorful 3D Christmas Tree Craft via iheartcraftythings.com
(Definitely one to bookmark—it’s simple, colorful, and totally windowsill worthy.)
6. Cone-Shaped Christmas Tree Craft with Fingerprint Lights
(So Cute It Might End Up as Grandma’s Favorite Ornament)
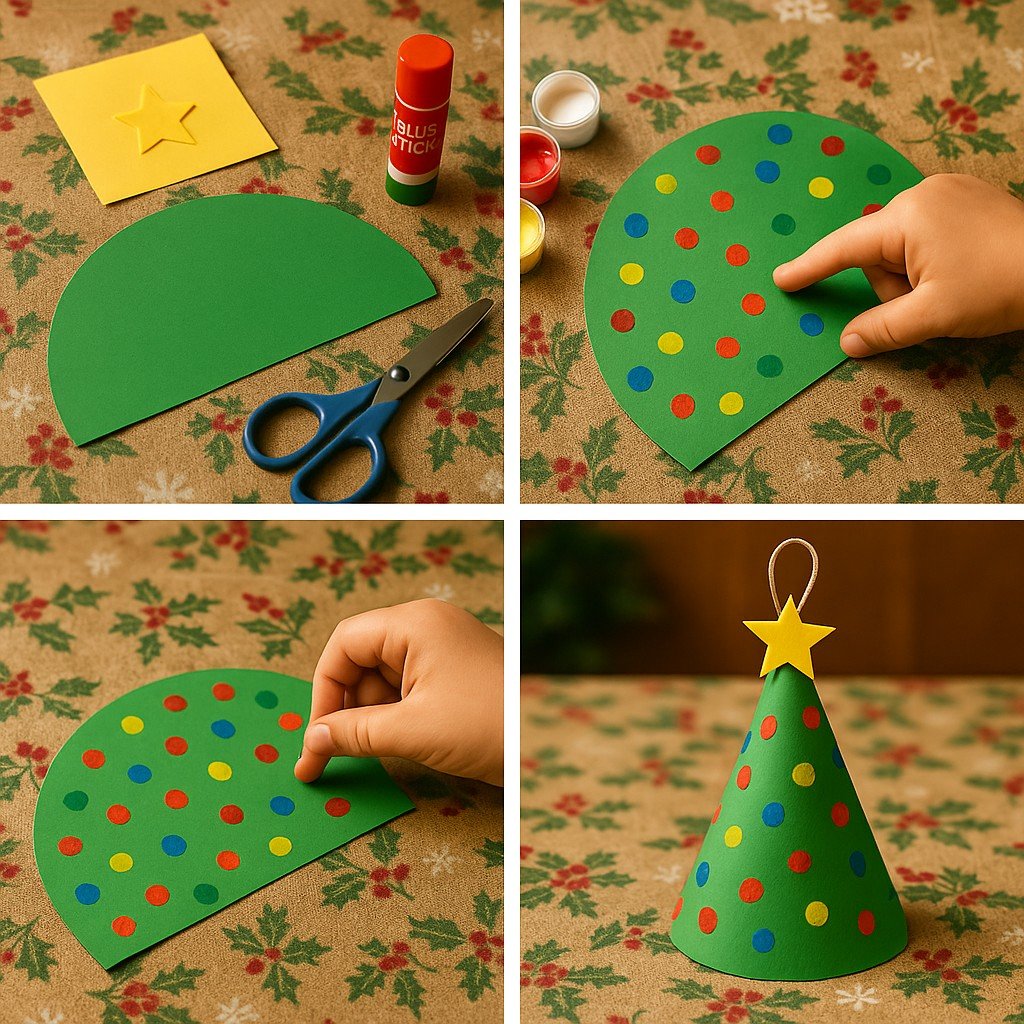
What You’ll Need
- Thick green cardstock (or print it in black & white and trace it!)
- Gold glitter paper or plain yellow cardstock for the star
- Acrylic paints in fun holiday colors (red, yellow, blue, orange, purple, green…)
- Glue stick or double-sided tape
- Craft scissors
- Ornament string (about 10 inches)
- Small paper plate or paint palette
- Damp paper towel for cleaning tiny fingers between color changes
How to Make It
- Cut out a large half-circle from green cardstock – this will be the base for your cone-shaped Christmas tree. You can trace a bowl or a plate to get a smooth curve. Don’t stress about perfection—just make sure it’s big enough to roll into a cone.
- Cut out the tree shape – let the kids help if they’re old enough (or brave enough to handle scissors without turning it into modern art).
- Set up the paint station – pour your acrylic paints onto a paper plate or reusable tray. Keep wet wipes or damp paper towels nearby for messy fingers.
- Let the kids fingerprint the “lights” – they can dip their fingertips into the paint and press dots all over the tree shape. Use as many colors as they like—it’s their masterpiece.
- While the paint dries, cut out a yellow star from gold or yellow cardstock, and measure about 10 inches of ornament string.
- Tape the ornament string to the back of the tree near the top, forming a small hanging loop.
- Bend the tree into a cone shape – wrap the shape into a cone and secure the flap using a glue stick or double-sided tape. Hold for a few seconds until it sticks.
- Attach the star – glue the star onto the tip of the tree (and try to center it, unless you like your crafts with “personality”).
- Admire the finished piece – then hang it on the tree, in the window, or send it home as the craft that actually made it onto the fridge.
7. Festive Fringe Christmas Tree Craft
(That Looks Way Harder Than It Is)
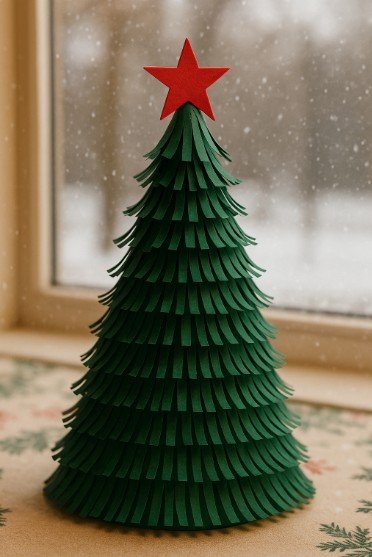
I swear, this is the one craft that gets everyone genuinely excited—yes, even the “I’m too cool for crafts” seven-year-olds. As soon as the scissors start fringing that paper, the energy in the room shifts. Suddenly, it’s a full-blown holiday production line.
And once it’s time to decorate? Forget minimalism. The kids pull out every last sparkly sticker, sequin, pompom, and rogue rhinestone we’ve collected since Easter. It turns into a glitter explosion in the best way possible. Honestly, these trees end up looking like they belong in some over-the-top elf boutique—and I’m here for it.
Want to see exactly how to make this festive fringe masterpiece?
👉 Check out the full tutorial here via Madness 24×7
(It’s easier than it looks—and trust me, the kids will go wild for it.)
via Madness 24×7
8. Paper Snow Globe Christmas Tree Craft
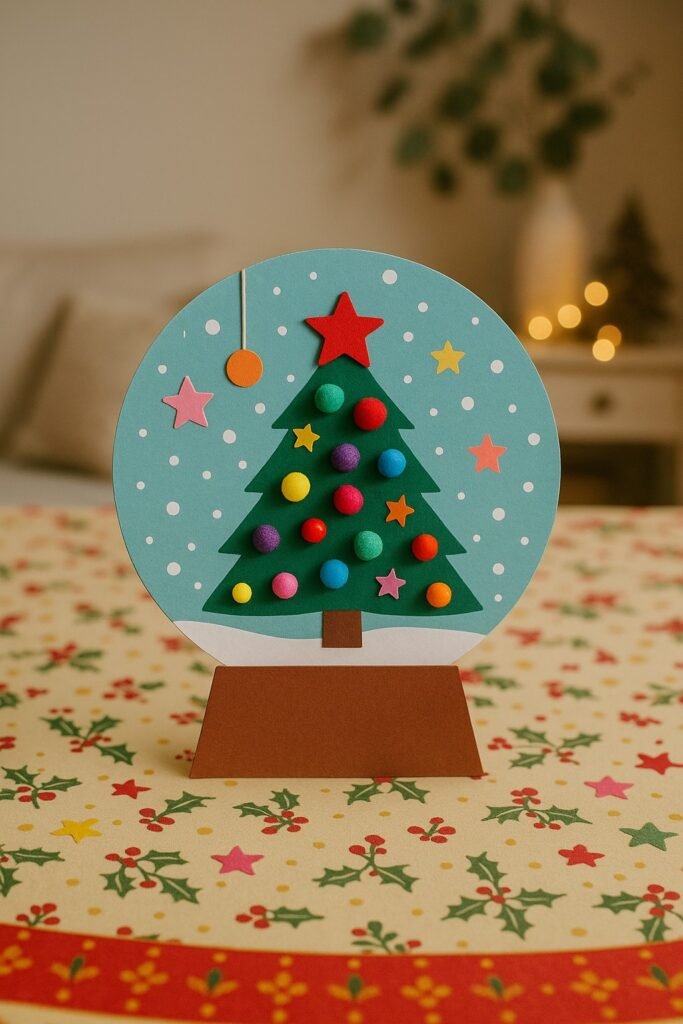
How to Make It
Cut out a large circle from sturdy light-blue cardstock—this will be the “glass” part of your snow globe.
Then cut a rectangle from brown paper for the base, and a simple triangle tree from darker green paper. Add a strip of white paper across the bottom as the snowy ground.
Glue all the pieces in place to form your paper snow globe scene—then decorate with whatever makes you happy: shiny pompoms, foam stars, sequins, buttons… anything goes. The sparkle is half the fun.
9. Fork-Painted Christmas Tree Craft
(Messy, Fun & Surprisingly Beautiful)
Why This Craft Is Secretly One of the Best Holiday Activities
Sometimes the simplest materials open the biggest creative doors. A plastic fork and some paint might not seem like much, but for a child, it’s pure magic. There’s no right or wrong way to drag the fork—no rules, no pressure—just full freedom to experiment with texture, movement, and color.
That freedom matters. It lets kids explore their creativity without worrying about staying “inside the lines.” Plus, it’s low-prep, low-cost, and high-reward—basically the holy grail of kids’ crafts.
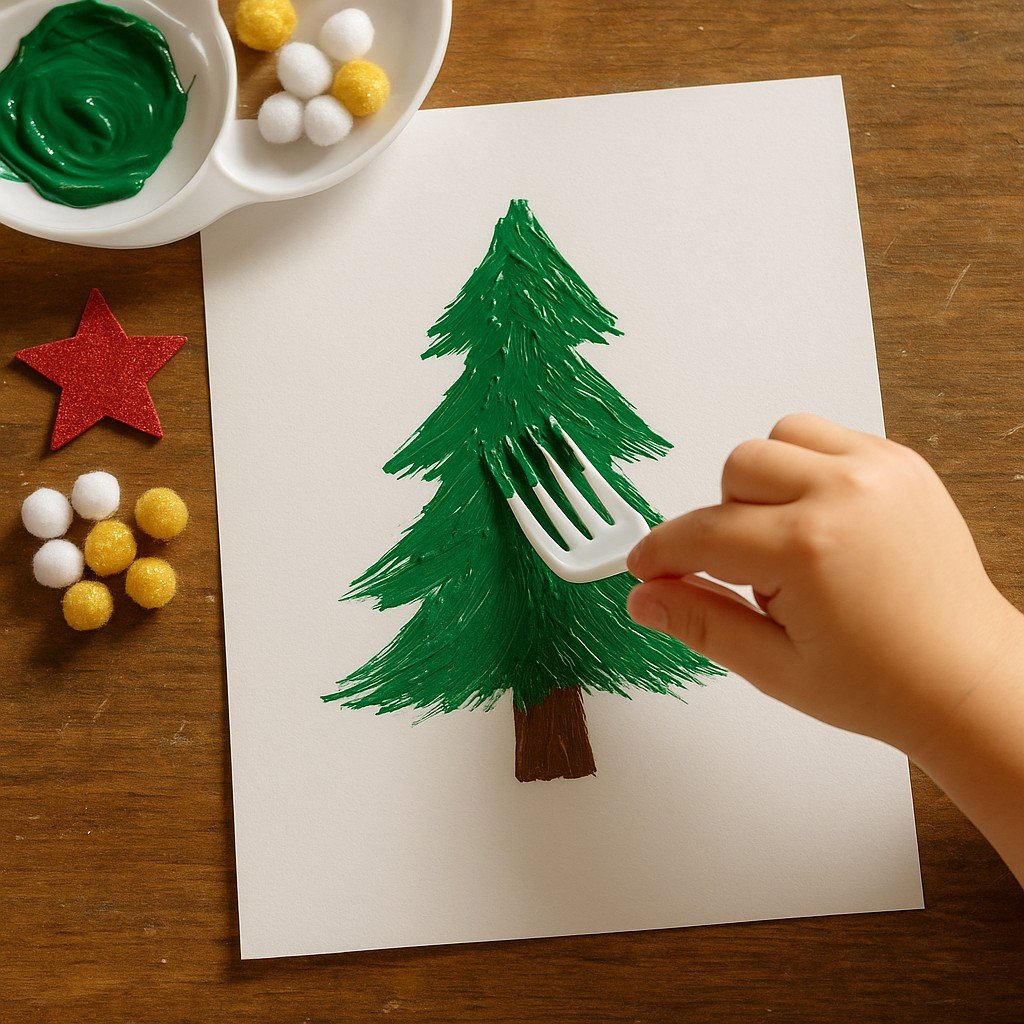
👉👉👉 Fork Painted Christmas Tree via thebestideasforkids.com
10. Elegant Layered Christmas Tree Craft
I saw this folded paper Christmas tree craft and immediately thought, oh great, more cutting. I mean, I love holiday crafting… in theory. We always start strong—with glitter in my hair and Pinterest-level ambitions—and end up peeling glue off the table for three days.
But I’ll admit: I gave this one a try, and I didn’t even cry once. I folded, I glued, I even let the kids pick the rhinestones (mistake—they used all of them). And you know what? I actually loved how it turned out. It looked fancy enough to impress, but not so complicated I needed a PhD in origami. That’s my kind of Christmas win.
A Quick Note on Safety
As with any craft or activity, never leave young children unsupervised, especially when using scissors, glue, small objects, or anything that could pose a choking hazard.
Even the simplest play can get unexpectedly messy (or inventive 😊), so make sure the space is safe, and all materials are age-appropriate.
And hey — part of the fun is doing it together, right?

If you love planning every delicious detail of the holidays, grab your FREE 20 pages printable Christmas Food & Drink Planner PDF to keep meals organized, stress low, and the treats flowing.

Final Thoughts (a.k.a. You’re Basically a Holiday Hero)
Let’s just pause for a second and acknowledge the obvious: you’re amazing.
You sat down—with glue sticks, scissors, glittery chaos, and a small person who definitely asked you 87 questions while holding the scissors backwards—and you made stuff. And you didn’t just scroll TikTok. You actually did the thing.
And that matters.
Because at the end of the day, it’s not about perfect folds or symmetrical stars (though look at you, overachiever). It’s about making memories. Sitting down. Laughing. Creating something with your kid that says, we were here, together.
So whether you did one craft or all ten: you’re doing it right.
I’d love to hear which one was your favorite—or which one covered your kitchen in sequins. Come say hi in the comments or tag me over at uniquemammas.com.
And hey… maybe let the glitter live on the floor until January. That’s what socks are for.
Don’t miss these extra fun crafts—they’re just too cute (and too easy) to skip!
Each and every Unique Mamma deserves a little expert support!
So Let’s keep in touch!
You’ll find plenty more on my Pinterest — follow me there too!
Be the first to know about my the latest contents.
Subscribe to my NEWSLETTER!
I would be happy if you would share your thoughts and questions.
Leave a comment or message!
E-mail: timea.klement@uniquemammas.com
Note: This post may contain affiliate links. As an Amazon Associate I earn from qualifying purchases. Please see Disclaimer policy for more information.